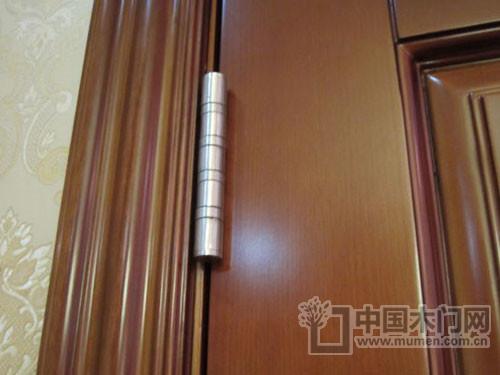
There are a lot of "traps" in the home improvement. I didn't do enough homework before the renovation. I didn't get enough in the decoration. After the renovation, I checked it and I was accidentally put into the trap. Today, I want to say how to check this problem after the installation of the solid wood door, it is also to cut this point, to remind everyone, wake up the relevant knowledge, prevent being blinded. Today, I mainly do science from the inspection of the door cover dumb and the door fan, and see how the inspection work should be carried out. First, the installation check of the door cover dumb 1. Door panel material: For the material of the door panel, it is necessary to avoid the pure density board provided by the manufacturer on the market. The environmental performance of this material is lacking, the nail biting force is insufficient, and the long-term use of the door may cause tilting and sinking. 2. Fixing the sleeve: There are many owners who are not sure about the fixing of the panel. I don't know how it is fixed, so when the woodwork is installed, they may not be monitored. The three sides of the sleeve are fixed by screws, and the sleeve and the wall of the hole are fixed by styrofoam, without using nails. 3. The connection between the horizontal frame and the vertical frame of the door cover: the connection between the horizontal frame and the vertical frame of the door cover, to achieve the standard of tight, flat and no misalignment; the angle between the vertical frame and the horizontal frame is 90°. The gap between the panel and the wall can be fixed by a wooden wedge. 4. Adjustment between the panel and the wall: The hammer can be used to further adjust the verticality of the panel to the wall and the ground. It is necessary to ensure that the horizontal and vertical panels are perpendicular to the wall surface. 5. After the vertical adjustment of the sleeve is completed, the styrofoam should be used and fixed by the struts so that the sleeve and the opening can be fully bonded and firmer. The struts should be removed after 30 minutes. Second, the door after the fixed inspection 1. The wood block we are talking about now refers to the piece at the bottom of the wooden door, which plays a protective function. It can prevent the paint from being thrown off during the handling of the wooden door and can be removed when the door is installed. 2. Pay attention to the depth of the groove, which should be consistent with the thickness of the single piece hinge. After installing the door, the hinges on both sides should be as flat as the edge of the door and the edge of the door. In addition, it should be noted that the screws should not be tilted. If the screws are tilted, or the hinges are pressed against each other after closing the door, the service life of the hinges is affected. 3. The specifications on both sides of the hinge are like this. The upper side of the door can be directly screwed up and fully fixed. On the side of the door cover, you can put two screws first, and the remaining two can be used up to the end to avoid a slight deviation of the hinge position and easy adjustment. 4. The hinge is installed, the door leaf is fixed... After that, pay attention to check the gap between the door leaf and the upper frame, the side frame and the ground. If the gap is too large or too small, the hinge should be adjusted again. How to check after installing the wooden door? The hopes mentioned above can help everyone. Carefully check and carefully check after installation, and keep away from installation quality problems. Garlic Tool,Garlic Press,Amazon Garlic Press,Garlic And Herb Tools Xiongyang Household Co., Ltd , https://www.yjkitchen-manage.com