In Photoshop 5.0 and later, there is a "Channel Mixer" tool under the "Image" - "Adjust" menu. Most people may use it rarely. Various professional media articles are also available. Very little detail is given about this tool. In fact, this is a very useful tool that can greatly correct the image when some channels lack color information. The Channel Mixer tool allows you to use the color information of a color channel to effect the color of other color channels, which is not achievable by other adjustment tools. With this command, you can do the following: 1. Make effective corrections to color casts. 2. Select a different percentage from each color channel to create a high-quality grayscale image. 3. Create high-quality, toned color images. The channel mixer and the above points are described in detail below. First, the channel mixer works The channel mixer dialog is shown in Figure 1. Second, the operation of the channel mixer 1. Open "Image" - "Adjustment" - "Channel Mixer". 2. Select the output channel, which is the channel you want to adjust. Drag left to any source channel slider to reduce the channel's share of the output channel 4. Drag the slider to the "Constant" option to enter the value. This option adds a channel with a different opacity to the output channel. 5. If you want to get a grayscale image, select "Monochrome" to apply the same settings to all output channels and create a color image containing only gray values. In the image to be converted to grayscale, the ratio of each source channel participating in forming a gray color can be adjusted separately. If you select and deselect the Monochrome option first, you can individually modify the blending of each channel to create a special hue image. 6. Click "OK" to complete the operation. Third, the use of channel mixer for image processing 1. Color image color adjustment Figure 3 is a landscape image. It can be seen at a glance that there is a problem with the color of the grass in the map. The color of the grass is greenish and lacks green. Therefore, we must think of ways to increase the Y value in the grass color. In order not to affect other colors, it is generally more convenient to use an optional color correction tool (Selective Color) for processing, with blue as the object of processing, and add Y to cyan, see FIG. After the operation of Fig. 4 is performed four times, the image becomes Fig. 5, and the effect is not very good. The reason is that in the color of the grassland, the content of its own Y site is very small (for example, the color value of the point where the reading is represented is C64%M24%Y7%K14%), in order to increase the Y network point The size is more difficult. (Next issue...) 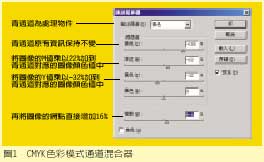 The working principle of the channel mixer is: selecting a certain channel in the image as a processing object (ie, an output channel), and then performing addition and subtraction calculations based on the current channel information of the image and other channel information to achieve the purpose of adjusting the image. Note that the color information added or subtracted comes from the same image position of this channel or other channel. That is, the image color information of a certain channel in space can be calculated from the channel and other channel color information. The output channel can be any channel of the source image. The source channel is different according to the image color mode. When the color mode is RGB, the source channel is R, G, B. When the color mode is CMYK, the source channel is C, M, Y, K. The figure shows the CMYK color mode channel mixer. The blue channel is the object of processing. That is, the result of the operation in the figure is only reflected in the blue channel. Therefore, the blue channel is the output channel. The calculations in the figure are: the original color information of the cyan channel of all images (the slider is still at 100%), minus 32% of the yellow information with the image position, plus the magenta channel color information of the same image position 22 %, and then increase the size of the network by 16%. Therefore, the output image has a percentage of cyan dots: C=C+Mx22%-Yx32%+16%. For example, the color of an image is C40%M50%Y30%K0%. After being processed in the figure, the output is the color C57%M50%Y30%K0%. The meaning of "constant" in the figure is: the information of this channel directly increases or decreases the percentage of the maximum value of the color representation, where 10% is actually 10% x 100%. The channel mixer only works when the image color mode is RGB, CMYK, and cannot operate when the image color mode is LAB or other modes. The tools under RGB are shown in Figure 2. Percentage, or drag to the right to increase this percentage, or enter a value between -200% and +200% in the text box.